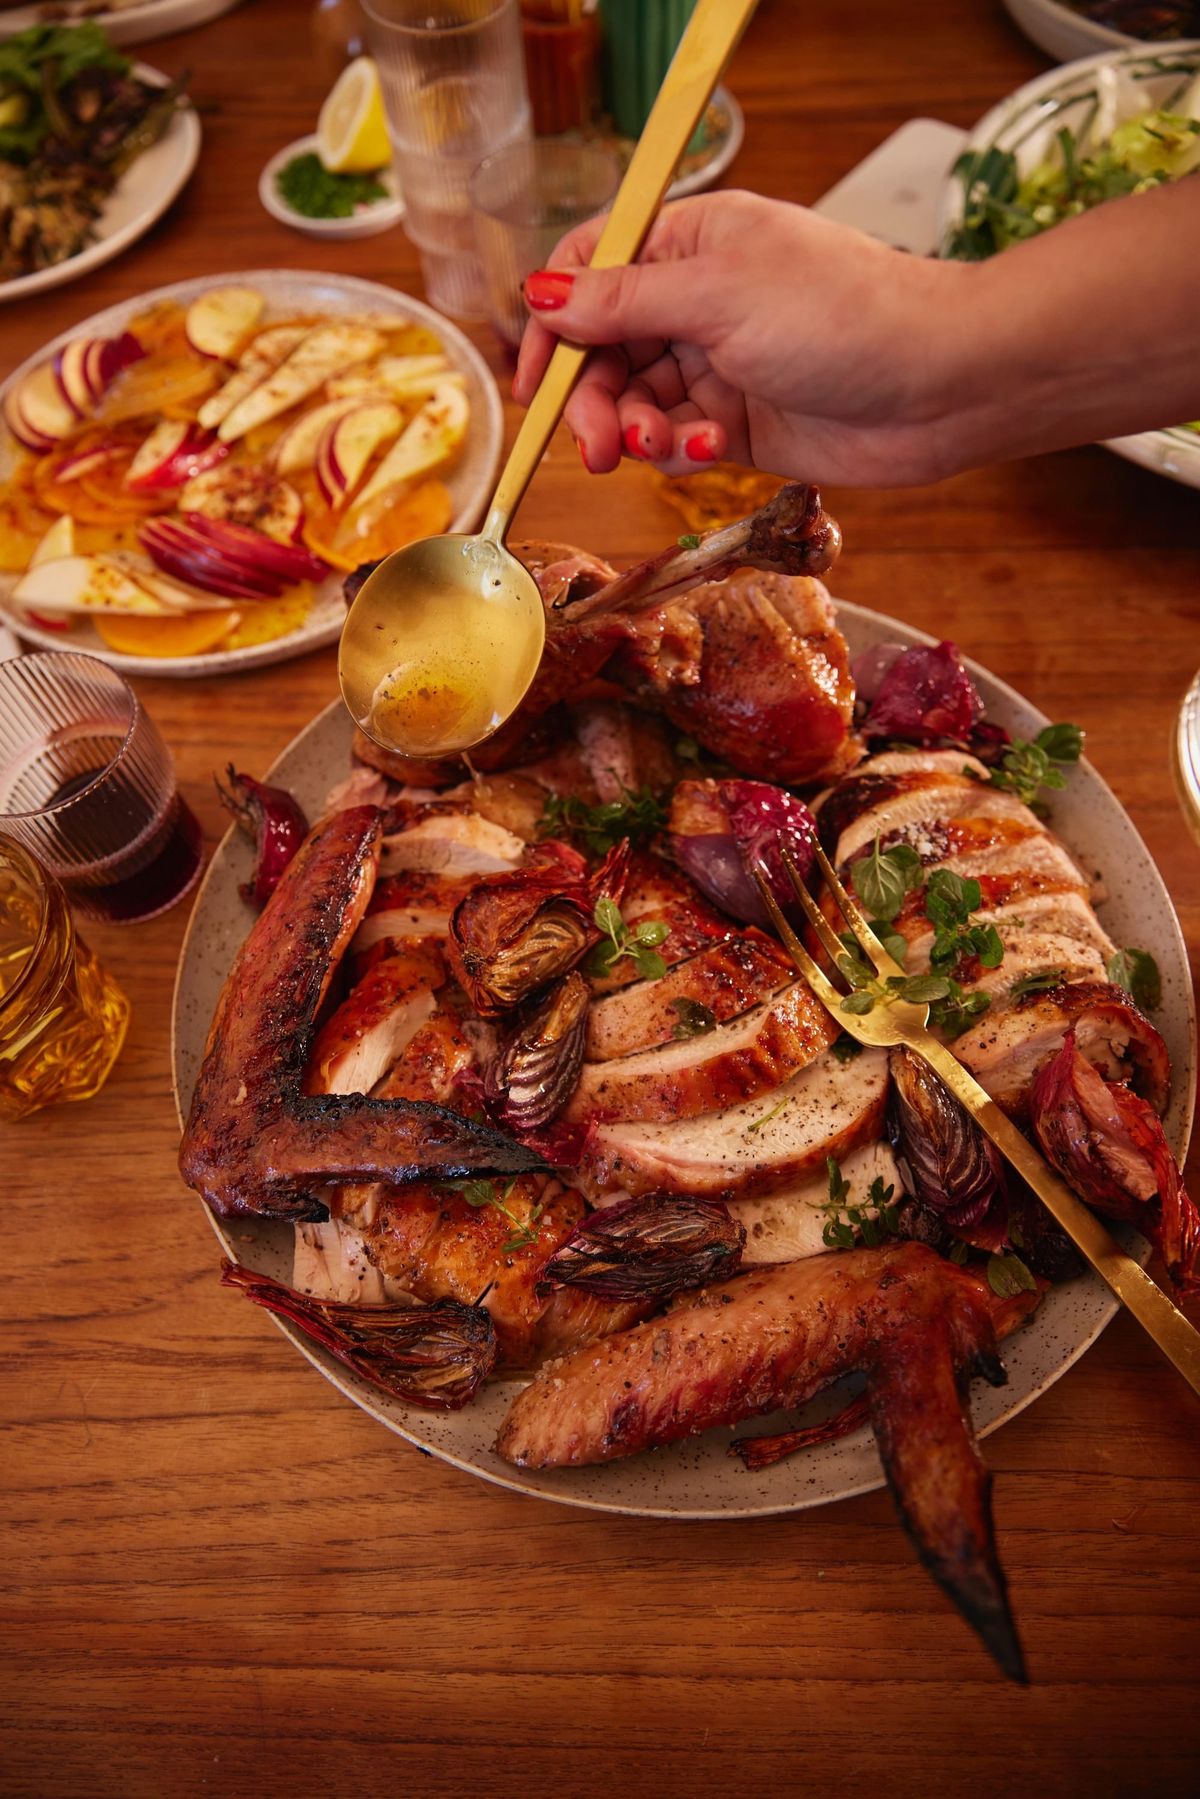
Very Good Turkey with Tangy Roasted Shallots and Excellent Gravy
This is a recipe for the most basic version of a well-seasoned turkey, which is sometimes all you want.
YIELD — 10–15 servings
This is a recipe for the most basic version of a well-seasoned turkey, which is sometimes all you want. Know that if you’re looking for a little more, some things that would be a great addition to include are listed below (Chopped rosemary or thyme! Crushed fennel seed or red pepper flakes! Finely grated garlic or lemon zest!).
While I don’t recommend going above a 16 pound turkey, you can always adjust the seasoning to accommodate a larger bird by doubling the dry brine. As for the time, you’ll need to increase the time in the oven by up to an hour, depending on how large the bird.
Ingredients
For the turkey:
- 12-16 lb turkey
- ½ cup kosher salt
- ½ cup light brown sugar
- 3–4 tablespoons coarsely ground black pepper*
- OPTIONAL ADDITIONS: ½ cup finely chopped rosemary or thyme, ¼ cup crushed fennel seed or red pepper flakes, 2 tablespoons finely grated garlic or lemon zest
- 1 bunch oregano, marjoram and/or thyme
- 2 heads garlic, halved crosswise
- 2 pounds shallots or small red onions, halved lengthwise, quartered if large, peeled if you like
- Olive oil, for drizzling
- 2 tablespoons red or white wine vinegar
For the gravy:
- ¼ cup unsalted butter
- ¼ cup all purpose flour or 3 tablespoons Wondra flour
- 4 cups liquid (pan drippings + turkey stock)
- 1–2 teaspoons dijon mustard
- 1 tablespoon soy sauce or tamari, plus more
- A few sprigs of thyme (optional)
Preparation
FOR THE TURKEY:
- Combine the kosher salt, brown sugar, and cracked pepper, along with any other seasonings you’d like to add in a small bowl.
- Place the turkey on a rimmed baking sheet lined with a wire rack. Remove the giblets (the bagged heart, kidneys and liver, and the neck) from the cavity. Using paper towels, pat the turkey dry on all sides. Very tenderly rub the brine all over the turkey, making sure to distribute the seasoning evenly to all the bits and parts, inside and out, but don’t worry about getting under the skin.
- Refrigerate the turkey, uncovered, for at least 12 and up to 48 hours.
- Remove the turkey from the fridge and transfer it to a clean baking sheet (or rinse the one it was on). Let sit at room temperature for 2-3 hours.
- Preheat the oven to 325°.
- Stuff the turkey cavity with any celery leaves, quartered onions, a halved head of garlic, leek tops, parsley stems, oregano and thyme you have lying around. Rest the turkey on top of some oregano or thyme if you have any to spare and a halved head of garlic. Scatter the shallots around the turkey. Drizzle everything with olive oil and season the shallots with a little salt and pepper. Truss the turkey’s legs with some cooking twine if you’d like.
- Transfer the turkey to the oven and roast, rotating the sheet pan and basting the turkey once or twice, for 3 ½ –4 hours, or until the turkey is deeply golden brown and the internal temperature is 165 degrees (a few degrees shy of 165 is OK, it will come to temp as it rests). Remove from the oven and let rest for at least an hour before carving.
- Transfer the shallots to a serving bowl and drizzle with vinegar.
FOR THE GRAVY:
- In a small pot, heat the butter over medium heat. When it’s melted, but before it begins to brown, add the flour and cook, whisking constantly, until the roux sizzles, thickens, and turns golden, about 3 minutes (it will look thin, not thick).
- Add the liquid a little at a time, whisking constantly to incorporate completely between additions (it’ll look a little wonky and clumpy at first, which is fine—it’ll all come together!), whisking until all the liquid is incorporated. Bring to a simmer, then add dijon and soy sauce to taste—it should be tangy, salty and deeply meaty. Add a few sprigs of thyme if using and simmer until the gravy reaches your desired thickness, adding more stock if it’s thicker than you’d like.
Note: *I do not expect anyone to hand grind ¼ cup black pepper using their peppermill, UNLESS, you’re using The Unicorn (not sponsored!), in which case it’s pretty easy. Or, you know, take turns grinding? A dedicated coffee grinder you use for spices or mortar and pestle will also do the job.

Discussion