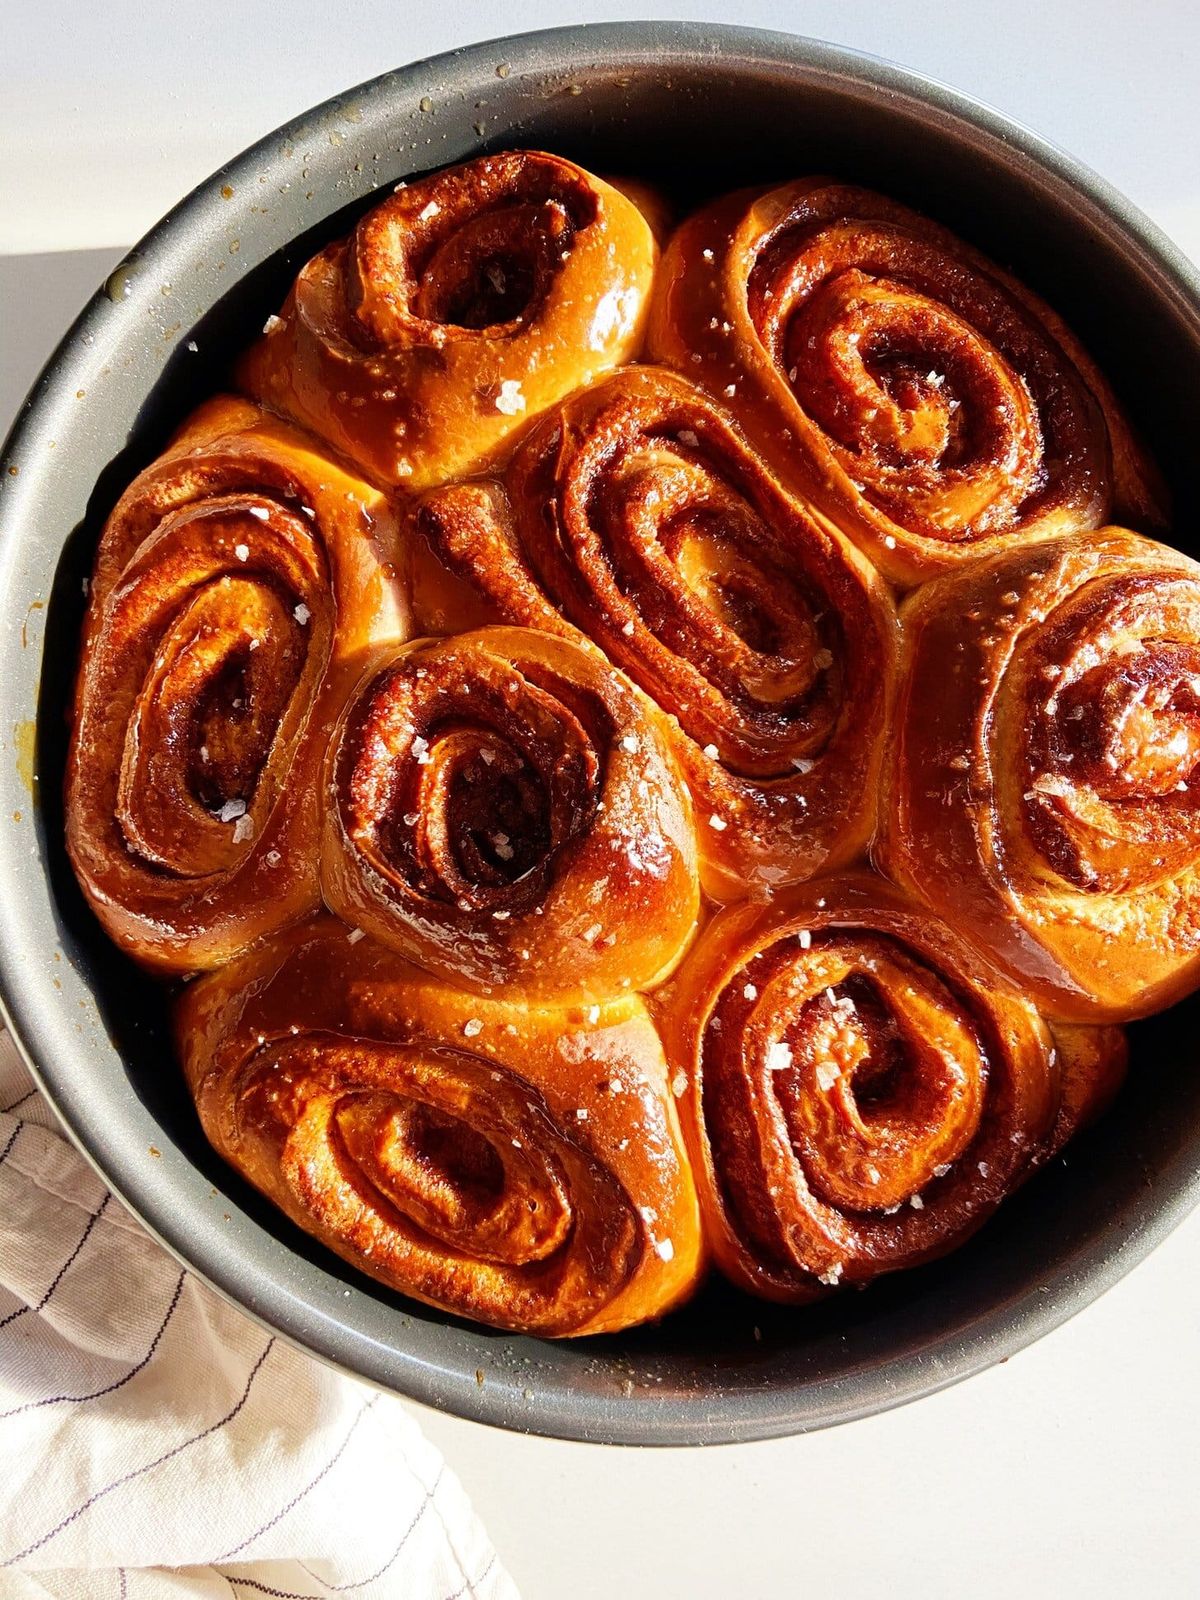
Sticky Cinnamon Rolls
These sticky cinnamon rolls are a perfect late winter weekend baking project. Warm, cozy, and wonderful.
YIELD — 12 rolls
This is a long recipe, both in how long they take to make (the dough should chill/proof for 12-24 hours!) and in length (17 steps!). I know. But maybe think of it as a meditative project, a soothing activity. Read the recipe. Spend time with it. Consider the roll. I think you will find that it really IS the journey, not the destination (just kidding, it is absolutely about the destination).
Ingredients
For the dough
- 1 cup whole milk or buttermilk (240g)
- ¼ cup sugar (50g)
- 2 ¼ teaspoons active dry yeast (1 envelope)
- 3 ¾ cups all-purpose flour (540g)
- 1 ½ teaspoons baking powder (6g)
- 1 ½ teaspoons kosher salt (5g)
- 2 large eggs
- 1 stick (½ cup) unsalted butter (113g), cold or room temperature, cut into ½” pieces
For the filling
- 1 cup light brown sugar (220g)
- ¾ teaspoon kosher salt (3g)
- 1 tablespoon ground cinnamon (8g)
- ½ cup (1 stick) unsalted butter (113g), softened or melted and cooled, plus more for greasing the pan as needed
- Non-stick spray (optional)
- ⅔ cup maple syrup (225g), divided, plus more for brushing on top
- Flaky salt (optional)
Preparation
FOR THE DOUGH
- Whisk buttermilk (or milk), sugar, and yeast together in the bowl of a stand mixer fitted with the dough hook attachment.
- Add the flour, baking powder, and salt. Mix on low speed until the dough starts to come together into a dry, shaggy mess. Add the eggs, one at a time, and mix on medium speed until you’ve got a smooth, sticky dough with no visible dry spots (you may want to stop the machine, scrape the bottom of the bowl with a spatula or dough scraper to make sure all the dry bits of flour are getting incorporated).
- With the mixer running, add the butter a few pieces at a time, letting the butter incorporate before adding more pieces. Eventually, the dough will take all the butter, disappearing into a silky, sticky mass. Knead this on medium speed for 3 to 4 minutes.
- Transfer the dough into a greased (with non-stick spray, softened butter or neutral oil) medium bowl and immediately cover with plastic. Place in the refrigerator for 12–24 hours (during this time, the dough is slowly rising which develops excellent flavor, the flour is hydrating which firms the dough up, and the butter is resolidifying, making everything easy to roll out).
FOR THE FILLING AND ASSEMBLY:
Once you’re ready to bake, prepare the filling and your workspace for THE ASSEMBLY (i.e. make sure you have a clean countertop, free of clutter to properly roll out the dough).
- Grease a 9” x 13” or 3 qt. baking dish with non-stick spray or grease with softened butter. Pour 2/3 cup maple syrup and swirl to coat the bottom; set aside. (Alternatively, grease up/maple syrup one 9” cake pan and one 8”x 4” loaf pan).
- Combine light brown sugar, cinnamon, and salt in a medium bowl; set aside.
- Remove the dough from the fridge. It should be firm, and not at all sticky (see?! magic). Lightly flour your work surface (ditch the cutting board, go straight onto your countertop), and turn the dough out.
- Using a rolling pin (I love mine from Herriott Grace) or wine bottle or whatever, roll the dough, flouring only as needed (a light dusting here and there will not hurt), roll to about 12” long and 24” wide.
- Using an offset spatula or back of a spoon if your butter is softened (or pastry brush if it’s melted), spread the butter onto the full surface of the dough. Scatter the brown sugar mixture on top and like you’re playing in the sand, run your hand over it to make sure it’s as lightly packed and evenly distributed as possible.
- Starting at the edge closest to you, roll the dough up, pressing and tucking lightly to eliminate the possibility of air pockets. Try to work quickly here, as the dough will have been out of the fridge for a while and the butter will likely begin to soften which will make it trickier to work with. Don’t rush but…..you know.
- Cut the dough in half so you have two pieces, roughly 12” each.
- Working with one piece at a time, cut each log of dough into six 2” pieces. Do not worry if your slices look weird and misshapen—they will plump up and issues will resolve themselves as they proof and bake.
- Place cinnamon rolls in your baking dish or cake pans. They should be pretty spaced apart and might appear a little sparse or lonely—don’t worry, they will get closer as they proof and even closer when they bake.
- Cover each pan with plastic wrap (if saving one for later, place it in the fridge now).
- Preheat oven to 350°. Place your wrapped pan of cinnamon rolls in a gently warm place (on top of the oven, fridge or radiator are popular places) and let the rolls proof, looking puffy and almost doubled in size, 30–35 minutes— they should definitely all be touching now. (If your rolls are coming directly from the fridge, this may take closer to 50–60 minutes.)
- Place buns in the oven and bake until they are puffed, deeply golden brown on the edges and into the centers, 35–40 for the 9x13 baking dish, and closer to 30–35 for the cake pans. They should feel firm when tapped, but still a little squishy towards the center. (Not to freak anyone out, but an underbaked cinnamon roll will be gummy and a little deflated, and an overbaked cinnamon roll will be dry and too hard to enjoy, so I hate to say: this part is important).
- Once out of the oven, immediately brush cinnamon rolls with a bit of maple syrup. Not so much to try and “soak” them, more just “glaze” them. This must happen when they are hot, otherwise, the maple syrup will just stay “wet” instead of “sticky.” Sprinkle with salt and let cool slightly before eating.
DO AHEAD: These are really best eaten the day of, but I wrapped them tightly and continued to eat them for a while and was pretty happy with the results. If I had more self-respect or were feeding someone else, I’d probably go through the trouble of heating them gently in an oven to warm them through, but I can tell you that’s not entirely necessary.


Discussion